
Overview#
This project takes a look into using the Infrastructure as Code (IaC) tool Terraform for managing a Proxmox environment and automating deployments for VMs and container workloads. The topics in this article include the initial setup using a Service Account, initial configuration, and an example Terraform deployment of two Proxmox VMs.
What is Terraform?#
Terraform is a free to use Infrastructure as Code (IaC) tool designed by HashiCorp that utilizes a declarative language along with a state file to manage infrastructure deployments. The state file is used for maintaining a persistent record of the infrastructure deployed by Terraform.
Infrastructure as Code#
Infrastructure as Code (IaC) is the concept of defining an environment or system using code. This can be a programming language such as Python, or a declarative manifest language such YAML or HCL. Using IaC helps to maintain a repeatable and consistent deployment each time it is run.
IaC solves the issue where using “ClickOps” (managing environments via web portal or GUI) can be time-consuming for large scale deployments, or sometimes produce different results due to accidental human error or changes an interface.
Using IaC can be much faster when deploying a large number of resources simultaneously.
There are two different method used with Infrastructyre-as-Code:
Imperative:
- Iterates through specific steps to provision each resource.
- Similar to following each line in a script file.
- Languages: Powershell, Bash, Python, Azure CLI.
Declarative:
- Defines the desired state of the environment.
- Uses manifest files to define how the environment should be.
- Languages: HCL (Terraform), YAML (Ansible, Docker, Kubernetes), Bicep (Azure).
What is a Service Account, and why should I use one?#
A Service Account is capable of authentication to a system, but dedicated to a specific use only. Unlike a regular user or administrator account, a Service Account is not typically used for local or web GUI login access, but instead authenticates using automated methods (SAML, API etc).
In the context of this project, the Service Account is dedicated for Terraform deployments and will only be used for that singular purpose. This ensures that any action made by this account can be identified as part of the Terraform workflow.
Requirements#
- An existing, working Proxmox environment.
- Network connectivity to Proxmox from local device or management VM.
- Install Terraform (see here for information).
- VM Template (details provided in a below section).
Service Account for Terraform (API Token)#
- From within Proxmox, navigate to
Datacenter > Permissions > Users. - Click the
Addbutton to create a new user account, entering the desired username and password. - Make sure to change the
Realmdrop down item toProxmox VE authentication server. This ensures the account is contained with Proxmox only, and not related to the host operating system. - Once done, click
Add.
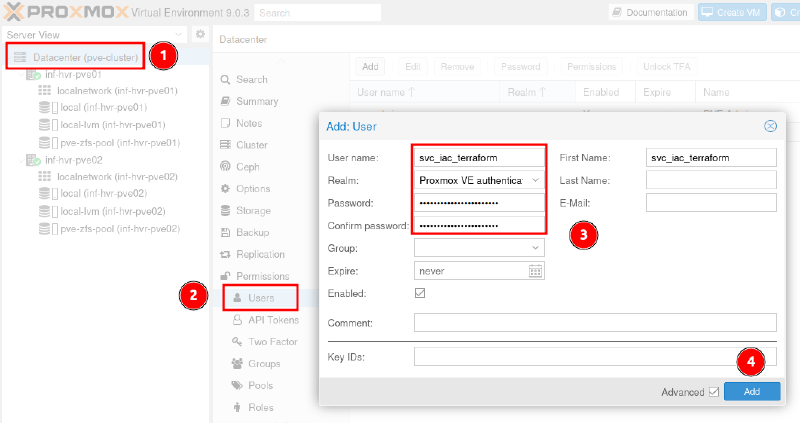
Now we need to add the required permissions to the new account.
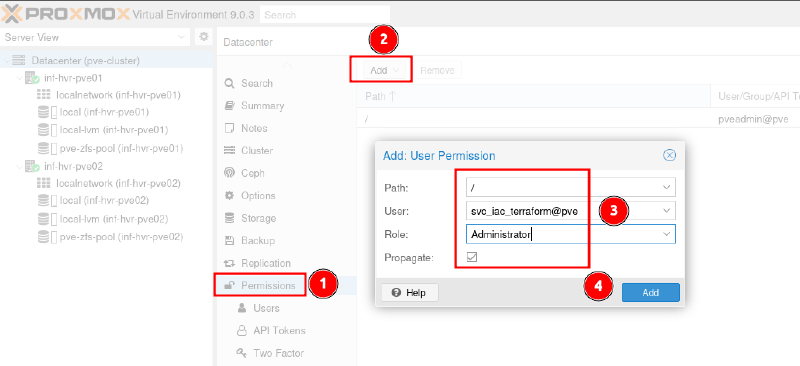
Add permissions:
- Navigate to
Datacenter > Permissionsand click theAddbutton. - Select the path
/, the newly created user account, and the roleAdministrator. - Ensure that the tick box
Propagateis enabled to deploy the permissions. - Click
Addto complete the permissions assignment.
Although it is possible to authenticate Terraform with a username and password, it is considered more secure to utilize the API token method and simply rotate keys as required or on a regular basis.
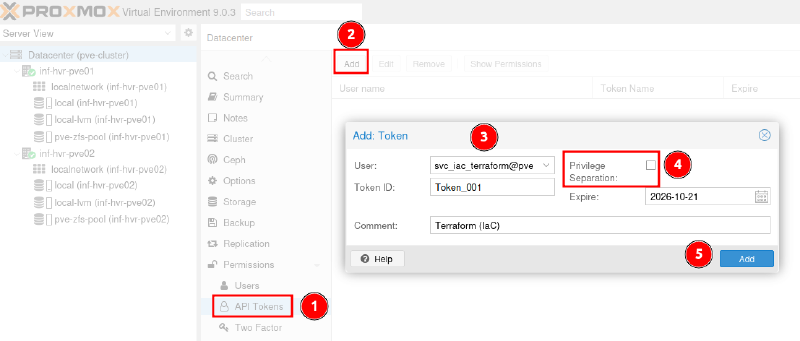
Create API Token:
- Navigate to
Datacenter > Permissions > API Tokensand click theAddbutton. - Select the Terraform service account from the
Userdropdown menu. - Enter a name for the token assignment (not important, can be anything).
- Ensure that the option
Privilege Separationis not ticked as this will split API permissions from the already assigned user permissions. - Click
Addto complete the API token assignment. - Once created, the token secret will be shown only once!. Ensure that you store this securely in a password manager, Azure Key Vault or other secure location. This will be needed later in the Terraform configuration.
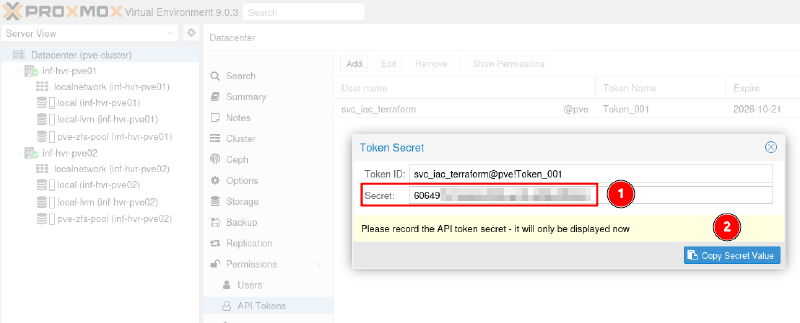
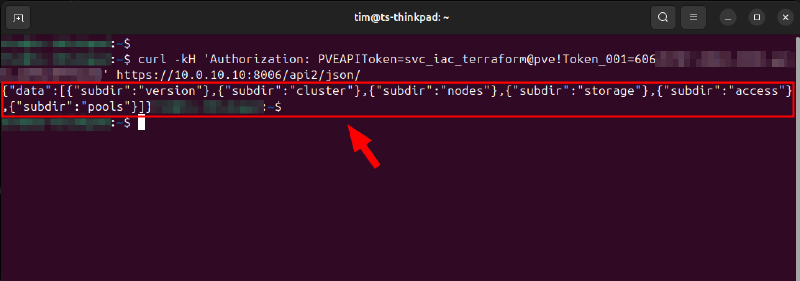
We can now test this API token using the Curl command from the terminal. Executing the following command should result in a response. Make sure to replace the following with your own token and host address values.
# Test API token authentication.
curl -kH 'Authorization: PVEAPIToken=svc_iac_terraform@pve!Token_001=123456-abcd-1234-1234-1q2w3e4r5t' https://10.0.10.10:8006/api2/json/
Successful result:
Prepare VM Template#
Install Required Tools#
- From within the Proxmox web interface, navigate to one of the Proxmox hosts and access the terminal (shell).
- Install the package
libguestfs-tools.
libguestfs-tools package will provide functionality to inject the image with the Qemu guest agent. The Qemu guest agent is used to exchange information between the host and guest, and to execute commands in the guest OS.# Update repository and existing packages.
apt update && apt upgrade
# Install package: libguestfs-tools
apt install libguestfs-tools -y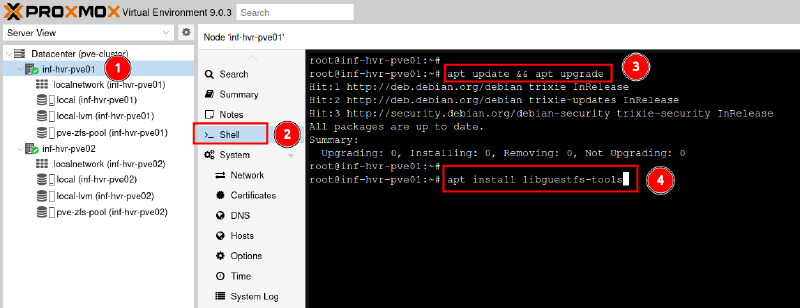
Cloud-Init Image File Preparation#
Using a Ubuntu cloud-init image speeds up and standardizes VM deployment by providing initial parameters such as hostname, IP address and SSH keys. This method of using a single template will allow us to spin up multiple VMs in the same deployment, each with different settings.
Download the image file from the URL provided. If another version is required, the URL can be browsed by removing the section after https://cloud-images.ubuntu.com/.
# Download Ubuntu cloud-init image.
wget https://cloud-images.ubuntu.com/noble/current/noble-server-cloudimg-amd64.img
Once the image file has been downloaded, we can resize/expand the image. This will allow for more useable disk space later on.
# Expand the image filesystem.
qemu-img resize noble-server-cloudimg-amd64.img 32G
Use the ‘virt-customize’ tool to inject the image file with the Qemu Guest Agent package, a helper daemon, which is installed in the guest. It is used to exchange information between the host and guest (VM).
# Add the Qemu guest agent to the image file.
virt-customize -a noble-server-cloudimg-amd64.img --install qemu-guest-agent
If required, the root password can be set at this point also, using the command below.
# Set default root password.
virt-customize -a noble-server-cloudimg-amd64.img --root-password password:changeme123!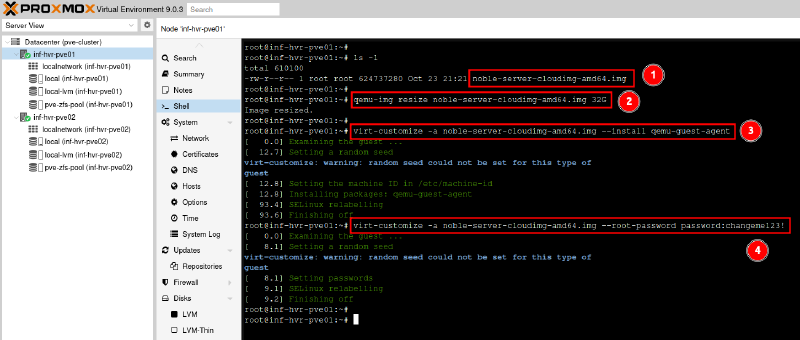
Provision Initial VM & Convert to Template#
With the image now ready for use, we can proceed to create a VM that will later be converted into a template.
- From a Proxmox host terminal session, execute the following command to create a new VM.
- The VM should appear in the VM list on the left hand side menu of the Proxmox web interface.
# Create new VM from image file.
qm create 901 --name "ztmp-ubuntu-2404-server-cloudinit" \
--ostype l26 --memory 2048 --balloon 0 --agent 1 --bios seabios \
--boot order=scsi0 --scsihw virtio-scsi-pci \
--scsi0 local-lvm:0,import-from='/root/noble-server-cloudimg-amd64.img',backup=0,cache=writeback,discard=on \
--ide2 local-lvm:cloudinit --cpu host --socket 1 --cores 2 \
--vga virtio --net0 virtio,bridge=vmbr0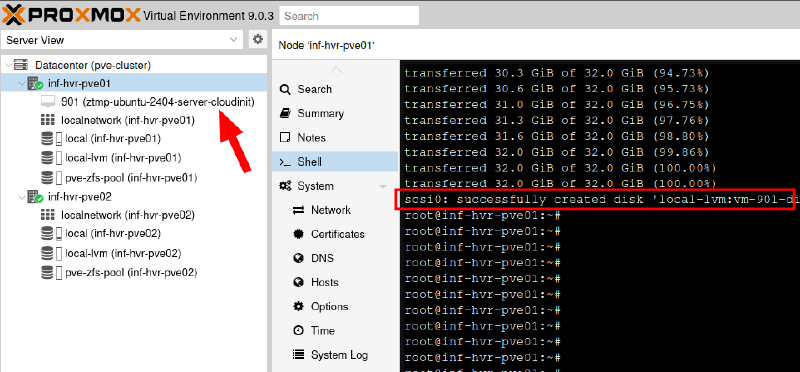
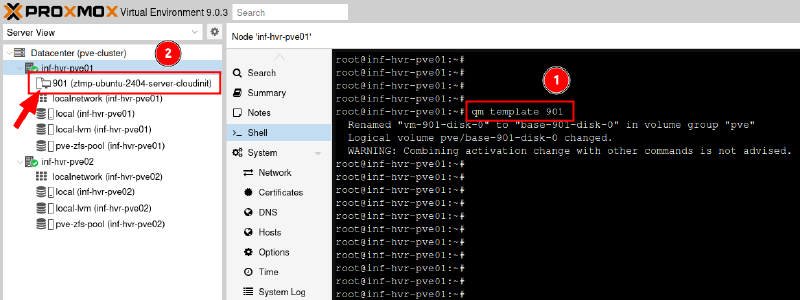
- Convert the new VM into a template so we can use it with Terraform for automating deployments.
# Convert the VM to template.
qm template 901- The icon representing the VM will change from the VM icon, to the template icon when completed.
Terraform Configuration#
Create & Populate Terraform Files#
Terraform uses configuration files (.tf) to define resources and setup Terraform components. The next step is to create a working directory for the project. Run the following commands to create a new directory containing the required files.
# Create new working directory and base files.
mkdir proxmox-terraform && cd proxmox-terraform

# Create empty Terraform files.
touch main.tf variables.tf providers.tf proxmox.tfvars- providers.tf
- Defines and configures the providers required by a Terraform configuration.
- A provider is a plugin that allows Terraform to interact with an external service or API (Proxmox, Azure etc).
- main.tf
- Used to define the core/main resources for a deployment (VM, networks, containers etc).
- variables.tf
- Used to define variables that are required and referenced within the main configuration.
- proxmox.tfvars
- Contains variable inputs and secret values that should not be in the main code files.
Populate the new files as per below, replacing the example values with your own.
providers.tf
terraform {
  required_providers {
    proxmox = {
      source = "bpg/proxmox"
      version = "0.85.1"
    }
  }
}

provider "proxmox" {
  endpoint  = var.pve_url # Use the variable reference.
  api_token = var.api_token # Token value noted in earlier step.
  insecure = true # Required due to self-signed certificate presented by Proxmox.
}
variables.tf
# Proxmox Variables
variable "pve_url" {
  type = string
  description = "The URL of the target Proxmox host used in deployments."
}

variable "pve_node" {
  type = string
  description = "The name of the target Proxmox host."
}

variable "api_token" {
  type = string
  sensitive = true
  description = "The API token used for Proxmox authentication."
}
proxmox.tfvars
# Proxmox Variables [SECRETS]
# Using a TFVARS file with variables keeps all secret values out of the main code base.
# Make sure never to commit files with secrets to public Git repositories.

# Proxmox Host Details
pve_url = "https://10.0.10.10:8006/api2/json" # Host URL with API suffix.
pve_node = "inf-hvr-pve01" # Host name.
api_token = "svc_iac_terraform@pve!Token_001=123456-abcd-1234-1234-1q2w3e4r"
main.tf
# Create two new VMs from the pre-configured template.
resource "proxmox_virtual_environment_vm" "test_vm_01" {
  name      = "vm-test-01"
  node_name = var.pve_node # Using variable to define the Proxmox host.
  clone {
    vm_id = 901 # ID number of the template within Proxmox.
    full = true # Full cone, as opposed to linked.
  }
  agent {
    enabled = true
  }
  memory {
    dedicated = 2048 # 2GB RAM
  }
  initialization { # The cloud-init configuration.
    dns {
      servers = ["10.0.20.254"]
      domain = "svr.homelab.int"
    }
    ip_config {
      ipv4 {
        address = "dhcp" # "10.0.20.55/24"
        #gateway = 10.0.20.254
      }
    }
  }
}

resource "proxmox_virtual_environment_vm" "test_vm_02" {
  name      = "vm-test-02"
  node_name = var.pve_node # Using variable to define the Proxmox host.
  clone {
    vm_id = 901 # ID number of the template within Proxmox.
    full = true # Full cone, as opposed to linked.
  }
  agent {
    enabled = true
  }
  memory {
    dedicated = 2048 # 2GB RAM
  }
  initialization { # The cloud-init configuration.
    dns {
      servers = ["10.0.20.254"]
      domain = "svr.homelab.int"
    }
    ip_config {
      ipv4 {
        address = "dhcp"
      }
    }
  }
}
Execute Terraform Deployment#
With the Terraform files now populated, we can execute the Terraform commands from our local machine to deploy the resources (VMs).
Initialize#
Execute the following to prepare Terraform in the current working directory.
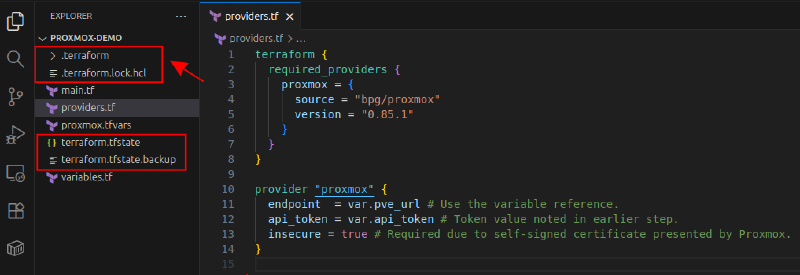
This process will download the providers defined in the providers.tf file and create a Terraform configuration directory, along with files related to the state.
# Initialize Terraform in current directory.
terraform init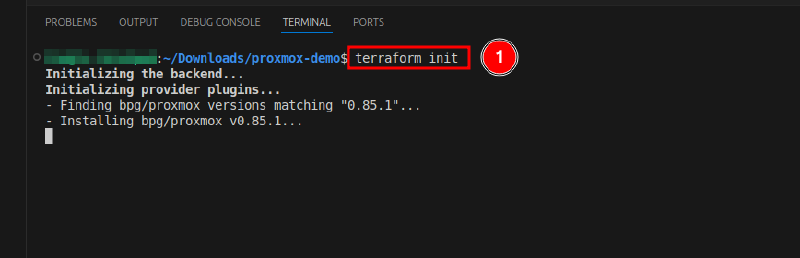
Plan & Apply#
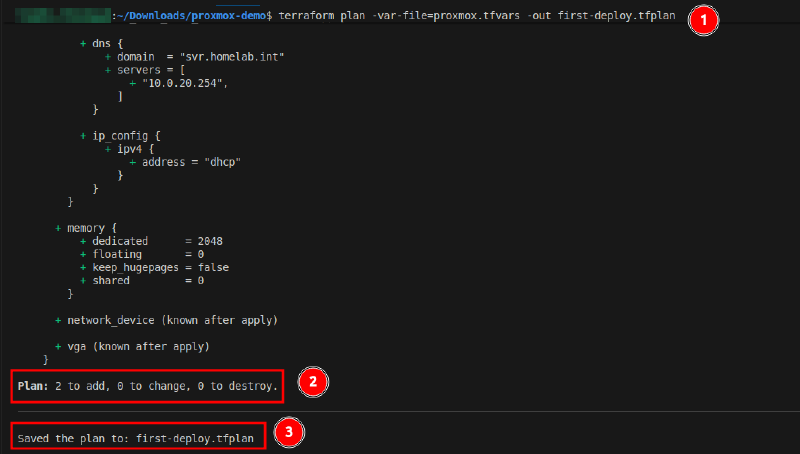
Next, we can review the intended changes by running a Terraform plan. During this process, Terraform will compare the file contents with it’s current state file and produce an output of what changes it intends to make on the target system (Proxmox in this case).
# Run Terraform plan, provide filename for variable values and output plan to file.
terraform plan -var-file=proxmox.tfvars -out first-deploy.tfplan
The output on screen shows the additions indicated by the + symbol. This shows that two new resources (the VMs) will be created with the shown configurations. The plan file has been saved locally. We can use this with the apply command to ensure that the deployment uses this exact plan.
Symbol Guide:
- Add:
+ - Modify:
~ - Remove:
-
With the plan reviewed and approved, we can now proceed with the deployment. Run the apply command, followed with confirmation by entering y when prompted. To avoid this prompt, use the --auto-approve command switch. Pass in the variable values file (TFVARS) and the plan file from the previous output.
# Run Terraform apply, provide names for variable values and plan files.
terraform apply -var-file=proxmox.tfvars first-deploy.tfplan --auto-approve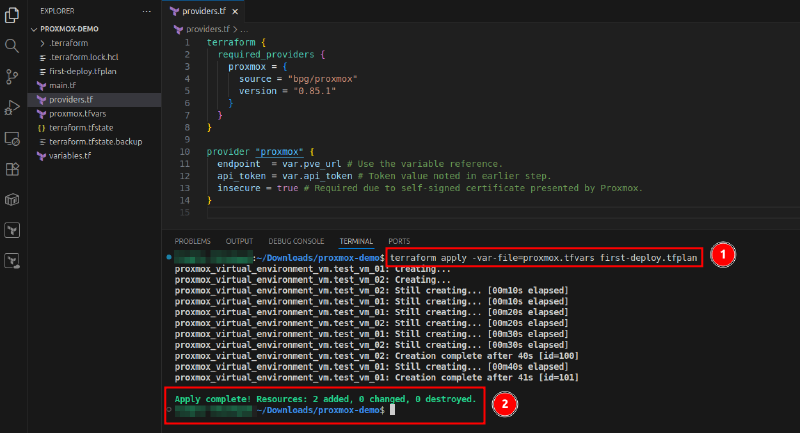
The new VMs should now be visible in the Proxmox web interface. Running the same command again will display a message that the current environment already matches the configuration.
$ terraform plan -var-file=proxmox.tfvars -out first-deploy.tfplan
proxmox_virtual_environment_vm.test_vm_01: Refreshing state... [id=101]
proxmox_virtual_environment_vm.test_vm_02: Refreshing state... [id=100]

No changes. Your infrastructure matches the configuration.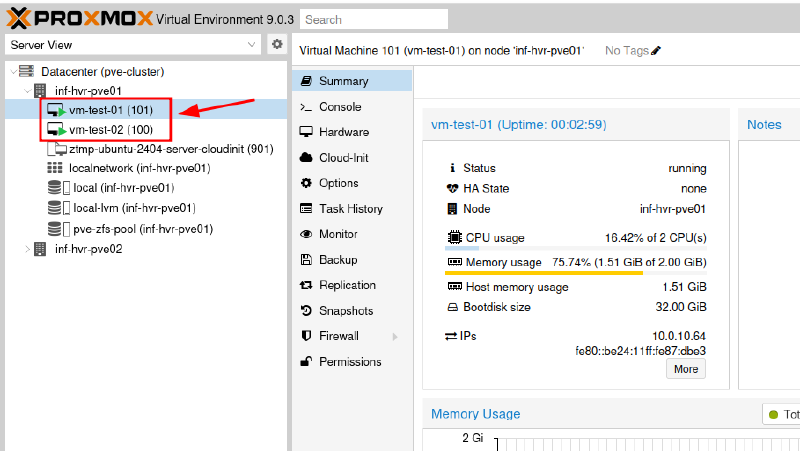
Destroy#
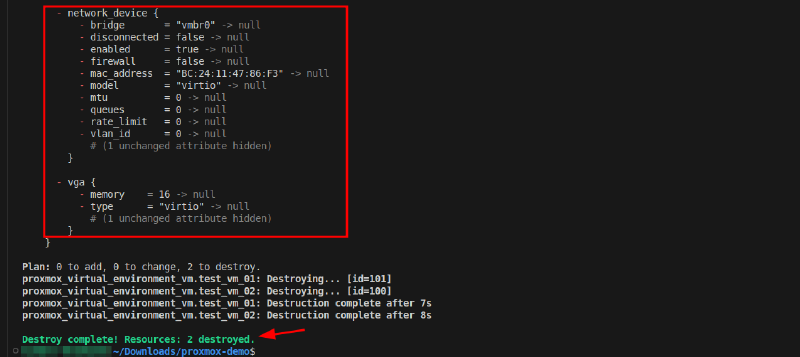
This final step provides a way to remove all resources deployed. As with the apply command, you will be prompted to enter y unless using the --auto-approve command switch.
# OPTIONAL: Output to terminal and file, the intended changes made by destroy.
terraform plan -destroy -var-file=proxmox.tfvars -out=destroy.tfplan

# Destroy all resources stored in the state file (EVERYTHING).
terraform destroy
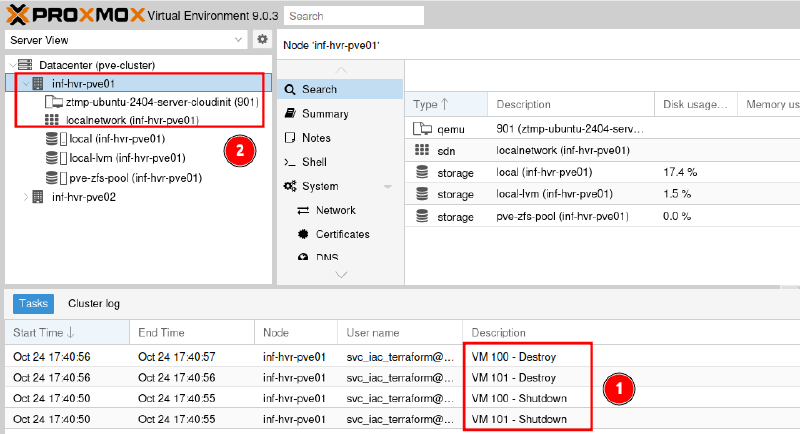
Once the process completes, the resources will no longer be listed in the Proxmox GUI, and the events related to their removal will be recorded.
Running the plan and apply commands again should produce the same results every time.
This is one of the benefits of using Infrastructure as Code. It helps to produce repeatable and reliable deployments each time it is executed.
Using IaC with automation tools like Github Actions, Gitlab or Azure DevOps can help to ensure consistency within an environment and automate deployment tasks using schedules or event triggers, such as git commits or pull requests.
Cover photo by Mourizal Zativa on Unsplash with HCL Terraform and Proxmox logo overlay.