

Overview#
Making configuration changes or rule updates to OPNsense does not always go to plan (ask me how I know). I’ve found myself having to re-configure OPNsense based on fragments of my sieve-like memory on several occasions.
Sure, I may have had some older manual config backups to use as a baseline, but without a regular, consistent backup schedule, the risk of losing hours to setup and testing is very real.
Automating the backup of OPNsense can save plenty of time and mucking about in the event something goes “pear-shaped”.
This process utilises a downloadable plugin for OPNsense called os-git-backup. When using GitHub, the only available option is to use SSH for authentication as the use of HTTPS credentials is not longer accepted by GitHub.
Check out the official OPNsense documentation for more details.
Requirements#
- Outbound Internet access from OPNsense (required for updates and plug-in installation).
- This must be a brand new repository, with no existing files (README or LICENSE etc).
- A new empty GitHub repository with visibility set to private!
Enable SSH for OPNsense#
- Navigate to the menu section
System > Settings > Administration. - Scroll down the page and locate the section
Secure Shell. - Enable the
Secure Shelltick box and optionally the root user account with password authentication.
Generate OPNsense SSH Key-Pair#
- Login to the OPNsense device via SSH.
- Generate the SSH key-pair in the
.sshdirectory (created if missing). - The use of parameter
-n ""ensures that no passphrase is set (required by the plugin).
# Generate SSH key-pair in ~/.ssh directroy.
ssh-keygen -t ed25519 -C "opnsense-git-backup" -f ~/.ssh/opnsense_git_backup -N ""- Confirm that the two files are generated in the
/root/.sshdirectory.
# View contents of SSH directory.
ls -al ~/.ssh

# Output
-rw-------  1 root wheel 411 Nov 18 21:53 opnsense_git_backup
-rw-r--r-- 1 root wheel 101 Nov 18 21:53 opnsense_git_backup.pub- Copy the output of both the private and public key (
.pub) files for use with GitHub and OPNsense configuration.
# View output of SSH private key file.
cat ~/.ssh/opnsense_git_backup

# View output of SSH public key file.
cat ~/.ssh/opnsense_git_backup.pub
GitHub SSH Setup#
A new, blank repository is required for this setup. This means no existing files can be present at all. If you are yet to create a new repository, do this now.
Make sure not to initialise the repo with a README or LICENSE file.
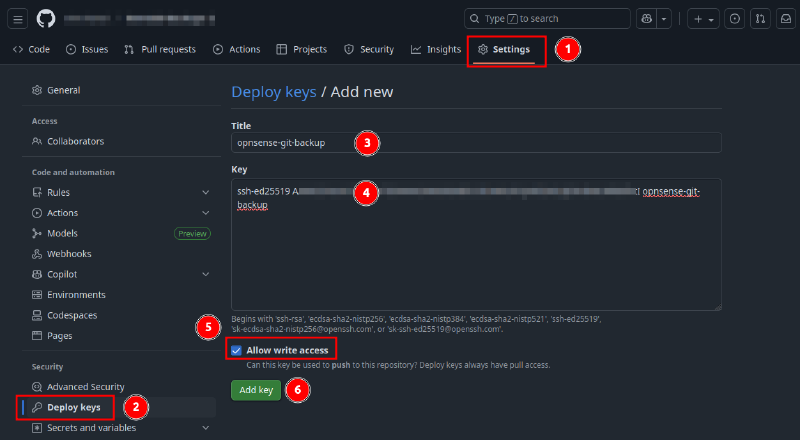
- From within GitHub, access the new repository.
- Navigate to the repository
Settingsand selectDeploy Keys. - Click
Add Deploy Key. - Add the SSH public key to the
keysection, enableAllow Write Access. - Click
Add Key.
OPNsense Backup Configuration#
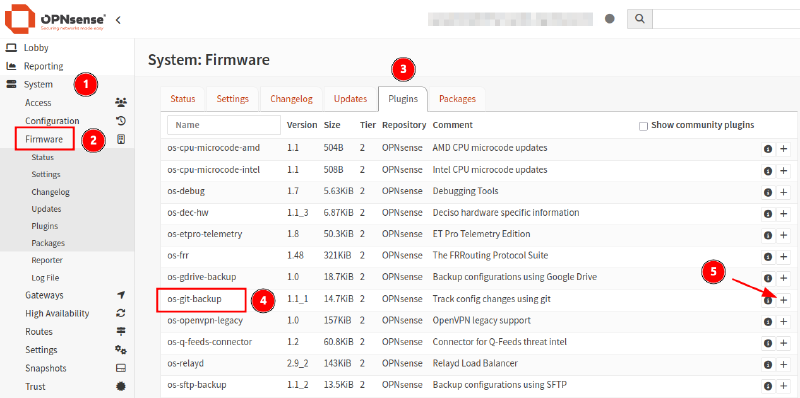
- From inside the OPNsense web GUI, navigate to the menu item
System > Firmware > Plugins. - Locate the plugin named
os-git-backupand click the+button to install it.
- Once installed, navigate to
System > Configuration > Backups. - A new menu section named
Gitshould now be available. - Enable the
Gitbackup service.
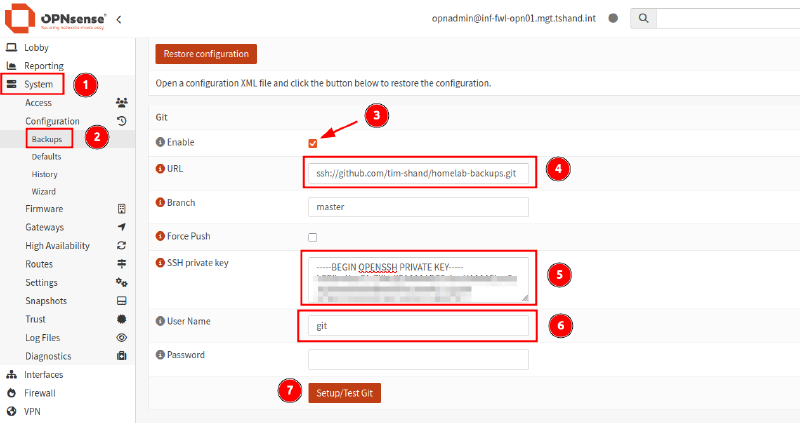
- Add the SSH URL and primary branch for your new GitHub repo (
masterby default). - Add the private SSH key in the required field.
- For SSH connections to GitHub, the user should be set as
gitwith no password defined (using SSH keys). - Click
Setup/Test Gitto confirm. - The page should refresh followed with a top header message
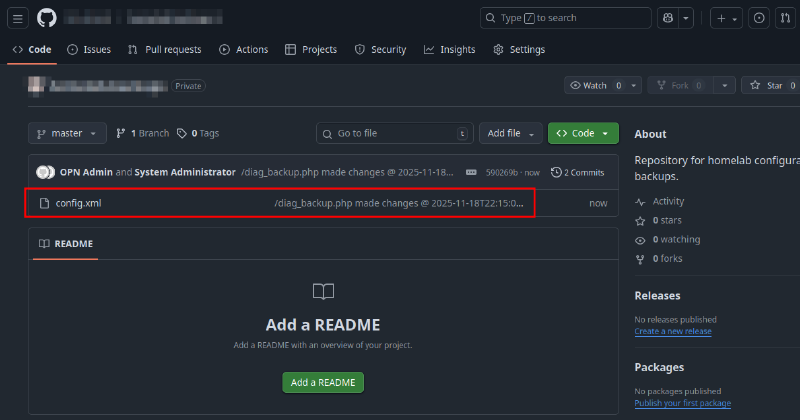
Backup successful, current file list: config.xml. - The OPNsense
config.xmlfile should now be visible in the GitHub repository.
Cover photo by Jandira Sonnendeck on Unsplash with OPNsense and GitHub logo overlay.