Overview#
Adding individual Proxmox nodes into a cluster allows for a centralized web management portal, removing the need to access each nodes web portal separately. Joining the cluster also allows for replicated configuration, making management of the nodes and the environment simpler.
Virtual machines can be migrated between nodes, which is useful for maintenance windows and providing High Availability functionality, which will be covered in a later guide.
NOTE: A minimum of 3 Proxmox nodes is typically required in order to maintain quorum. However, using a Qdevice allows for two-node cluster to operate and maintain quorum, without the need of a third Proxmox node. It is possible to operate a two-node cluster without a Qdevice providing quorum - however - the surviving node loses quorum triggering limitations to protect data.
The topic of Qdevice configuration is covered in the Qdevice section below.
Requirements#
- Two Proxmox nodes (or more) installed and initial configuration completed.
- Network connectivity between the nodes.
Configuring the Proxmox Cluster#
The first step to configure the Proxmox cluster is to ensure we have access to the web management console for both Proxmox nodes. Although this configuration can be achieved via the terminal on each node, we are going to use the GUI to provide a visual representation of how this all hangs together.
Create the Cluster (First Node)#
- Starting with the first Proxmox node in the environment, navigate to the web interface, login and select Datacenter from the left side navigation panel.
- Within this section, select Cluster, then click the button Create Cluster.
- Provide a name for the cluster and click Create.
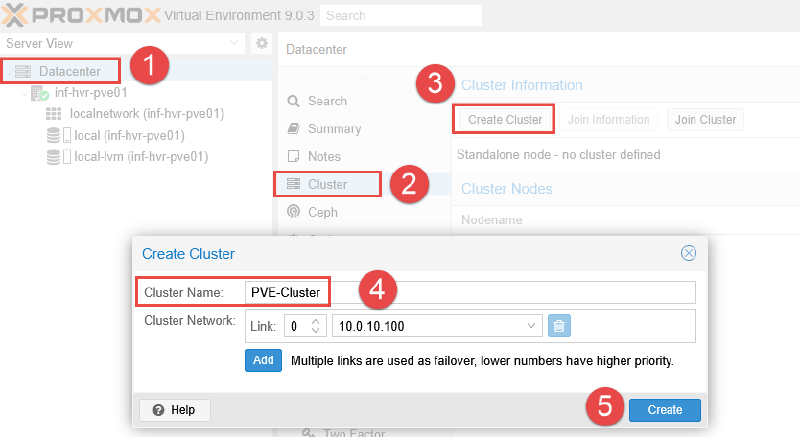
- You should see an output message with the text
TASK OKonce the cluster has been successfully created. - The Proxmox node should now also be listed under the section Cluster Nodes.
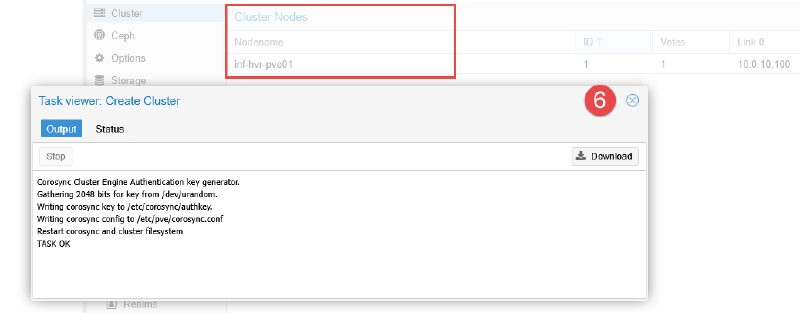
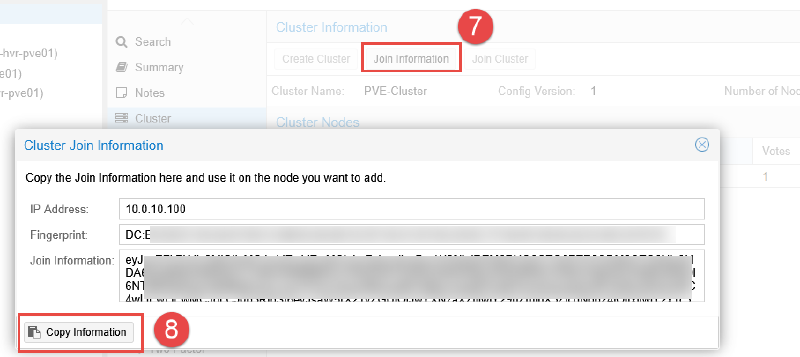
- Click the button Join Information and click the button Copy Information. This will be used to join the second Proxmox node to join the cluster that has just been created.
Join the Cluster (Second Node)#
- In another browser window, navigate to the web interface for the second Proxmox node.
- Login and navigate to the Datacenter section, select Cluster and click Join Cluster.
- Paste the copied data from the first Proxmox node into the Information field.
- Enter the root password for the first Proxmox node and click Join Cluster.
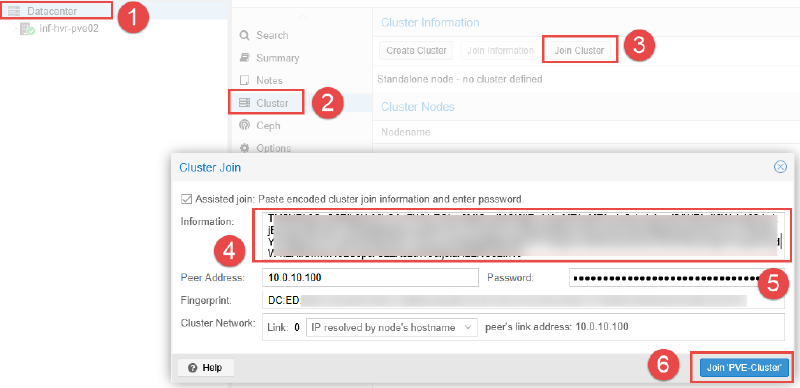
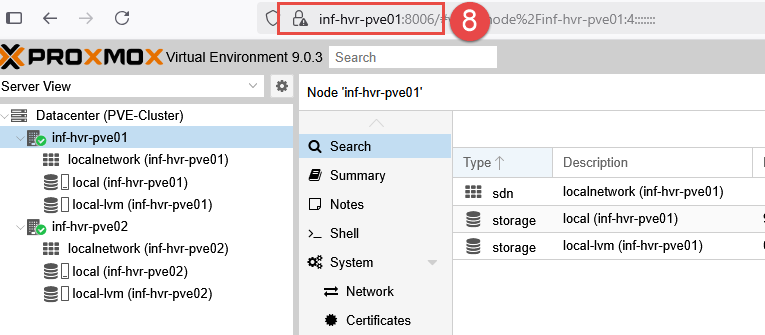
Once complete, you should now see both Proxmox nodes listed under the Cluster Nodes section, along with the nodes listed in the left side navigation panel.
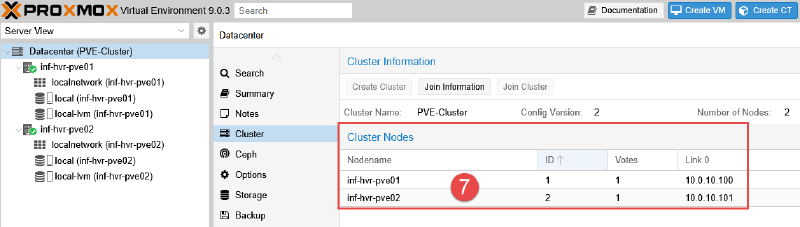
Joining the cluster will allow each node to be configured from the web interface of the other node, and visa versa.
Setup Qdevice for Proxmox Quorum#
This section explains the steps required to configure a Qdevice within a Proxmox cluster. Typically, a minimum of 3 Proxmox nodes is required in order to maintain quorum. However, using a Qdevice allows for a two-node cluster to operate and maintain quorum, without the need of an entire third Proxmox node.
NOTE: This guide is intended for clustered environments with only two Proxmox nodes, or environments with an even number of nodes where voting can result in a 50/50 situation. If your environment contains three or more Proxmox nodes, configuring a Qdevice is not required.
What is Quorum?#
Quorum refers to the minimum number of Proxmox nodes that must be online and communicating for the cluster to operate safely and make decisions using a voting system. A cluster requires more than half of its nodes to be online and connected to achieve quorum. This usually requires at least three nodes total, or a higher odd number of nodes.
Proxmox uses Corosync for communication between nodes in a cluster, and quorum is used to avoid split-brain scenarios, where two nodes of a cluster may try to manage the same resources independently, potentially corrupting the data.
The Qdevice Solution#
The Corosync QDevice is a service that runs on each Proxmox node, as well as on an additional device (server, raspberry pi etc), which is able to act as a “voting member” within the cluster. For this lab environment, an old Raspberry Pi will be used to provide this service. The Raspberry Pi will be connected to the LAN network where the Proxmox nodes are located.
Requirements#
- An existing Proxmox cluster.
- Download the Raspberry Pi Imager Tool.
- SD Card to be used with Raspberry Pi.
- Additional Ethernet cable to connect RPi to the LAN/Management network.
- Chosen Qdevice must be running a Debian operating system.
Qdevice: Raspberry Pi Preparation#
This section describes the steps required to configure a Raspberry Pi for use as a Qdevice to provide quorum to the Proxmox cluster. Although a Raspberry Pi is chosen for this specific task due to it’s small footprint, other options are available as replacements.
Write OS Image to SD Card#
- Remove the SD card from the Raspberry Pi and insert into a computer with an available card slot. A USB Card Reader can be used for devices with no built-in SD card slot.
- Run the Raspberry Pi Imager application and select the desired Operating System to suit your device model. I opted for the Lite (headless) version, omitting the Desktop environment to reduce resource consumption.
- Select the SD card as the Storage method.
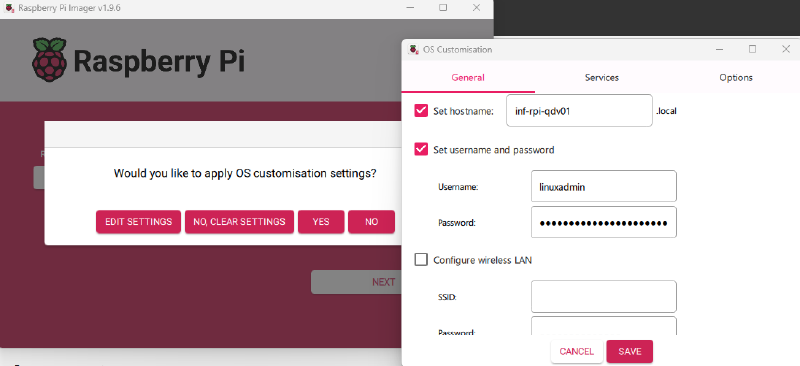
- An option is available to pre-configure the hostname, default credentials, WiFi network and locate settings if desired. I chose to configure these settings, including enabling SSH with password authentication under the Services tab.
- Click Next to begin writing the OS to the SD card.
Optional: DHCP & DNS Configuration (OPNsense)#
NOTE: This section regarding DNS and DHCP is completely optional and only applicable when using OPNsense for firewalling, routing and DHCP/DNS services. Skip this section if not required or static IP assignment on the Raspberry Pi is sufficient.
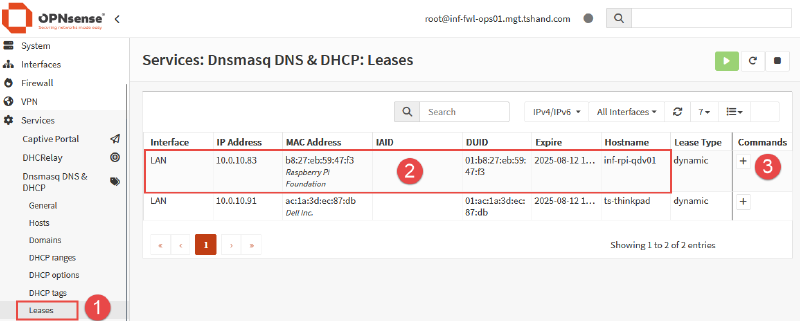
With the RPi connected to the LAN and powered on, I confirmed that it has received an IP address via DHCP in OPNsense.
Clicking on the plus icon under the Command column allows for setting this device to use a DHCP reservation, rather than receiving a random address from the DHCP pool.
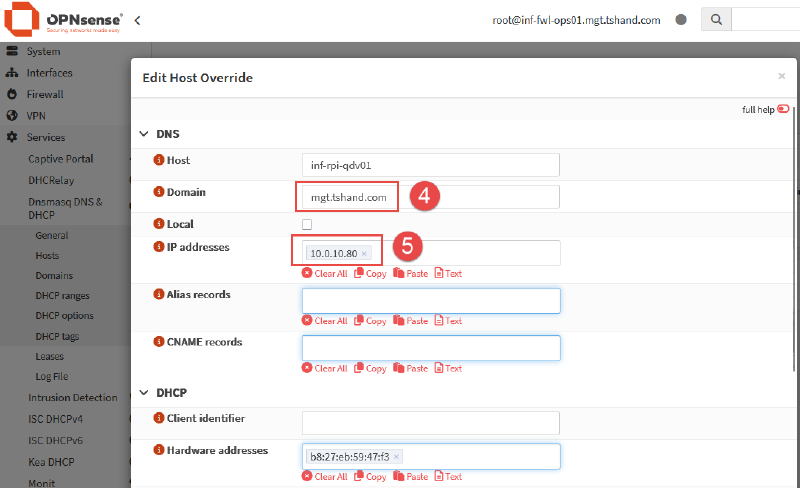
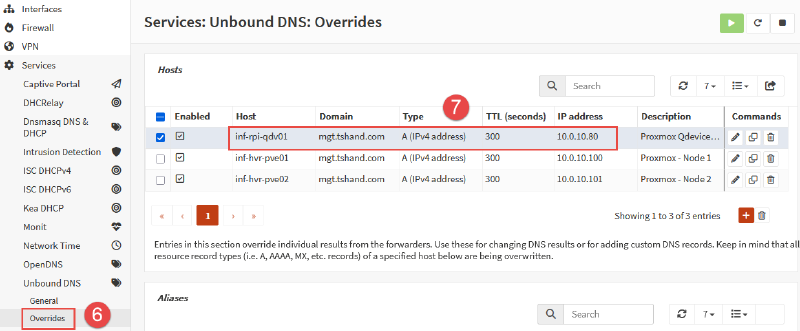
Entries for both the Qdevice and the existing Proxmox nodes can be added to DNS (Unbound) for name to IP address resolution. This will allow for us to utilize hostnames when connecting via HTTPS or SSH.
Reboot the RPi to allow it to receive the new IP address from the DHCP reservation. Once back online, confirm that SSH is available to the RPi device on the newly assigned IP address.
# SSH to the Raspberry Pi using hostname and user provided during install.
ssh linuxadmin@inf-rpi-qdv01

# List assigned IP address for eth0 interface.
ip addr | grep eth0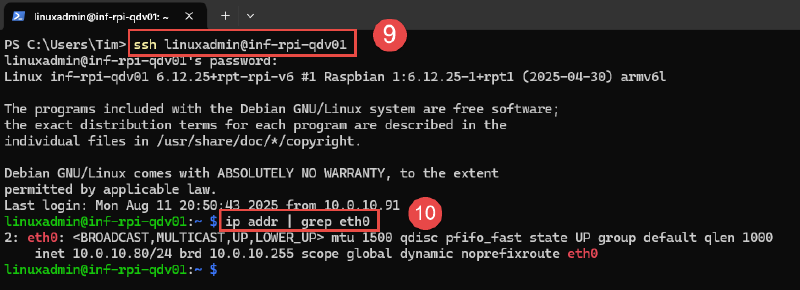
Qdevice: Installation & Setup#
Root Account SSH#
A requirement for the Qdevice daemon (service) is the ability to SSH into the Qdevice (Raspberry Pi) as the root user account.
NOTE: This is not ideal in terms of security, and not recommended in typical scenarios. However, after the initial setup of the Qdevice, firewall rules will be configured in OPNsense to block ingress and egress traffic to this device, other than from the Proxmox nodes, adding a layer of security.
- Reset the root user account password.
# Reset root account password.
sudo passwd root
- SSH into the Raspberry Pi (RPi) device using the account created during the installation and SD card imaging process.
- Edit the SSH config file
/etc/ssh/sshd_configusingnanoorvitext editors.
# Edit SSH config file.
sudo nano /etc/ssh/sshd_config- Locate the text
PermitRootLogonand set the value toyes.
PermitRootLogin yes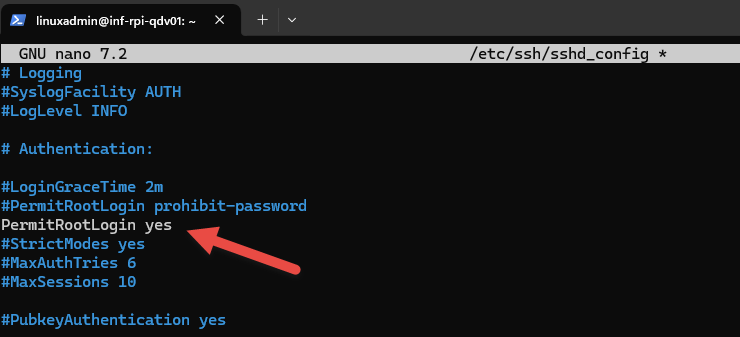
- Write the changes (
CTRL + O), then exit the nano text editor (CTRL + X). - Restart the
sshdservice.
# Restart the SSHD service.
sudo systemctl restart sshd
Package Installation#
Packages to be installed:
- Proxmox Nodes:
- corosync-qdevice
- Qdevice:
- corosync-qnetd
- corosync-qdevice
- SSH into the Raspberry Pi device update the install packages, then install the
corosync-qnetdpackage. - You may be prompted to install some other dependency packages, enter
yand pressEnter.
# Update repo list and upgrade installed packages.
sudo apt update && sudo apt upgrade -y

# Install corosync-qnetd package.
sudo apt install corosync-qnetd -y && sudo apt install corosync-qdevice -y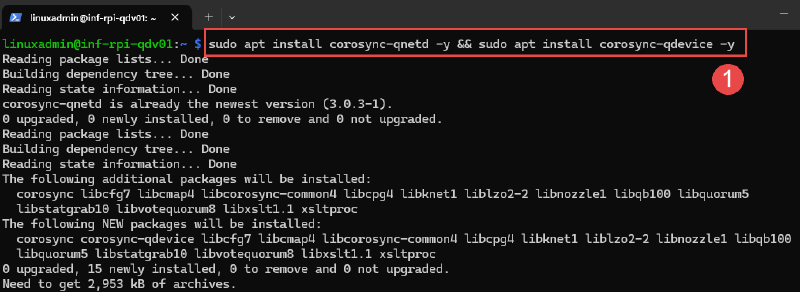
Qdevice: Proxmox Node Configuration#
With the Raspberry Pi device now configured, both Proxmox nodes need to be setup to work with the Qdevice.
- Login to each Proxmox node (either by SSH or web interface).
- Within a shell (terminal) window, install the
corosync-qdevicepackage. - Repeat this step for both Proxmox nodes, so the package is installed on both.
# Install the Qdevice package.
apt install corosync-qdevice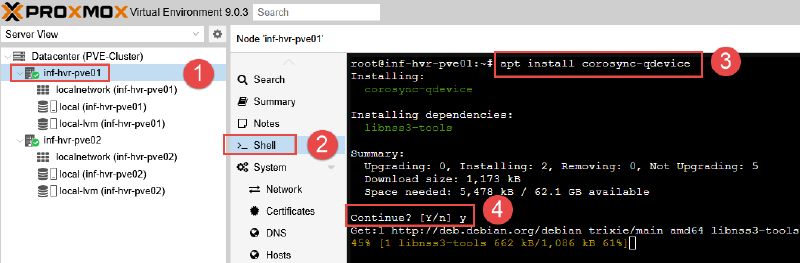
- Select a Proxmox node (this step is only required on one node) and access the terminal.
- Configure the Qdevice connection by running the
pvecmcommand.
# Configure Qdevice connection.
# Example: pvecm qdevice setup [IP ADDRESS]
pvecm qdevice setup 10.0.10.80- Enter the Raspberry Pi root user account password when prompted.
- The Qdevice should now be added to the cluster as a voting member.
- Verify using command
pvecm status, noting the “QDevice” listed under Membership Information. - You should now see the entry for ‘Qdevice’ listed.
Votequorum information
----------------------
Expected votes:   3
Highest expected: 3
Total votes:      3
Quorum:           2
Flags:            Quorate Qdevice

Membership information
----------------------
    Nodeid      Votes    Qdevice Name
0x00000001          1    A,V,NMW 10.0.10.100 (local)
0x00000002          1    A,V,NMW 10.0.10.101
0x00000000          1            Qdevice
With the Qdevice now added to the cluster to provide/maintain quorum, if a Proxmox node goes down, the cluster will still be able to function with the Qdevice providing the required vote to maintain cluster quorum.
Next Steps#
This concludes the steps required to configure a Qdevice used to maintain quorum for Proxmox. The next part in the series will provide the steps required to configure a ZFS storage pool in the Proxmox datacenter, useful when the option for shared storage is not available.
Cover photo by Kvistholt Photography on Unsplash with Proxmox and Raspberry Pi logo overlay.